API Keys Management
API Keys are the primary method for authenticating your applications with the Maraboo API. This guide covers everything you need to know about generating, managing, and securing your API keys.
Overview
Maraboo uses a Service Account + API Key system for authentication:
- Service Accounts represent individual services or applications
- API Keys are public/private key pairs tied to service accounts
- Each service account can have one active API key at a time
- Keys use HMAC-SHA256 authentication
Prerequisites
Before you can generate API keys:
- ✅ Complete the KYB verification process (all 3 steps)
- ✅ Have API access approved via service request
- ✅ Have access to the Business Portal
TIP
If you haven't completed the onboarding process, see the Getting Started guide.
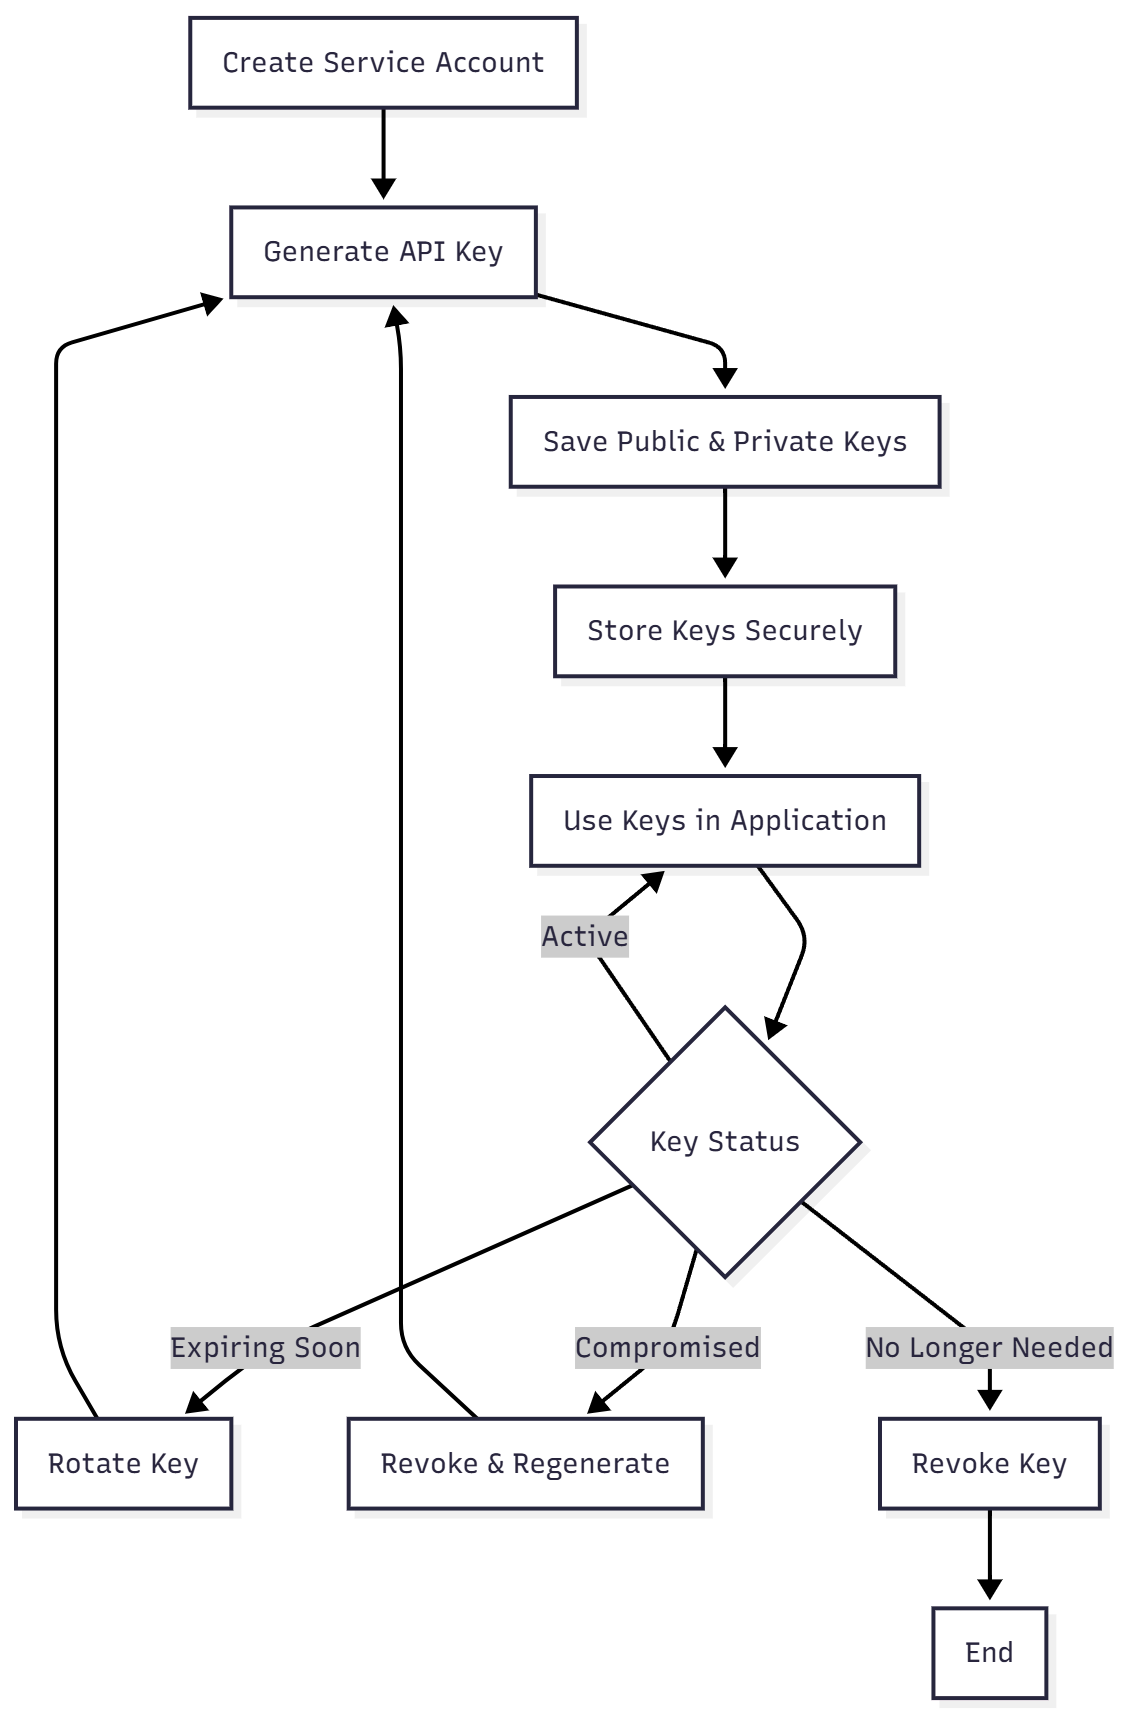
Creating Your First API Key
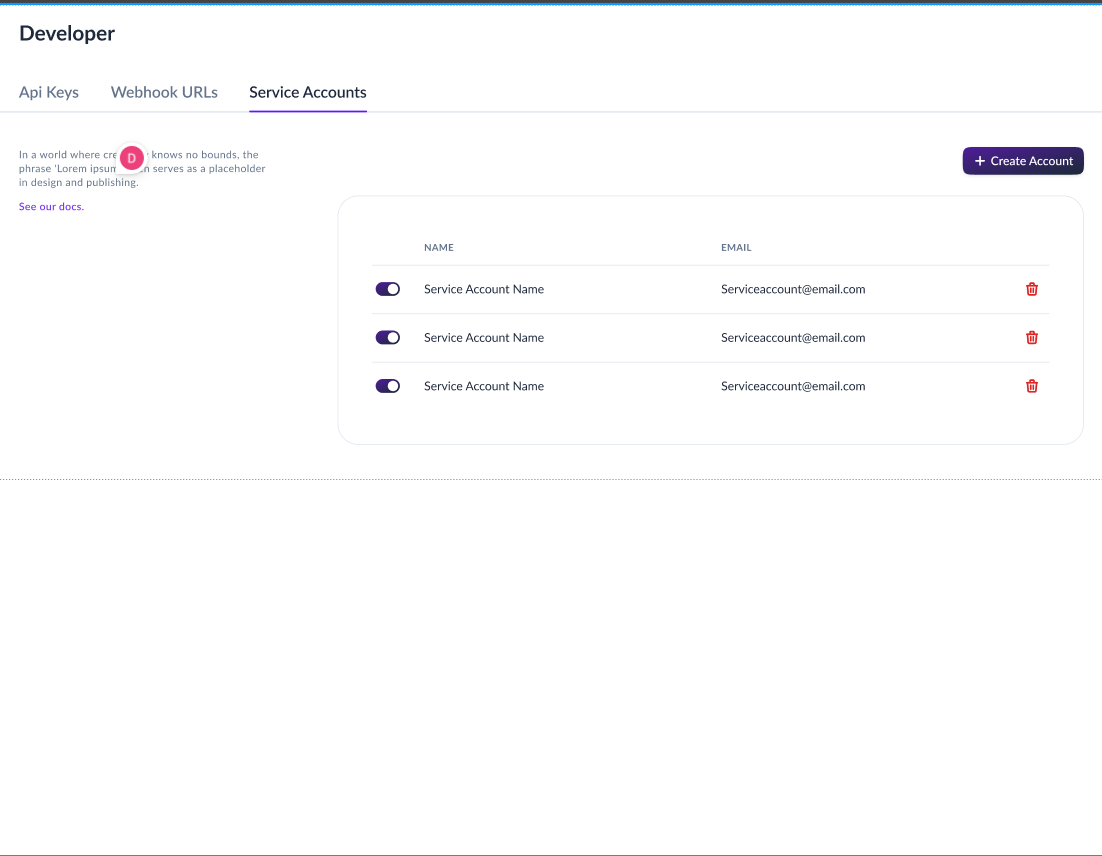
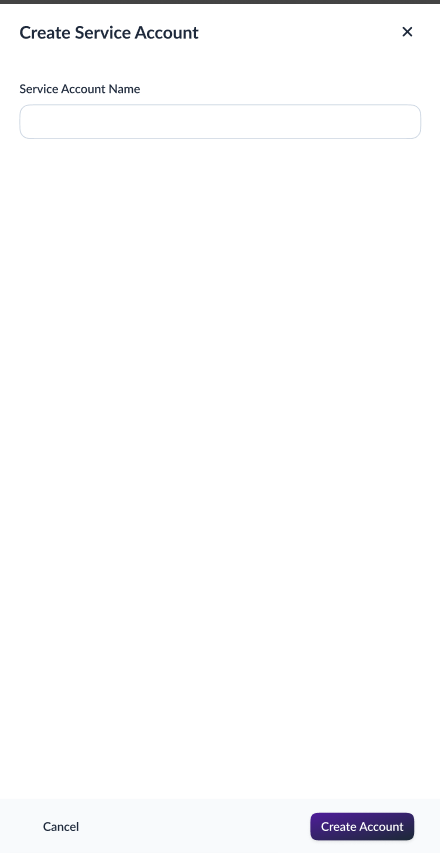
Step 1: Create a Service Account
Service accounts act as containers for API keys and help you organize access by application or service.
To create a service account:
- Log in to the Business Portal
- Navigate to Developers → Service Accounts
- Click "Create Service Account"
- Enter the following information:
- Name: A descriptive name for your service (e.g., "Production API", "Mobile App", "Backend Service")
- Description: Optional details about what this service account is for
- Click "Create" or "Save"
Naming Best Practices
Use clear, descriptive names that indicate:
- Environment:
production-api,staging-backend - Service:
mobile-app,web-dashboard,payment-processor - Purpose:
webhook-handler,data-sync-service
Step 2: Generate an API Key
Once you have a service account, you can generate an API key for it.
To generate an API key:
- Navigate to Developers → API Keys
- Select the service account you just created
- Click "Generate API Key" or "Create Key"
- The portal will display both your Public Key and Private Key
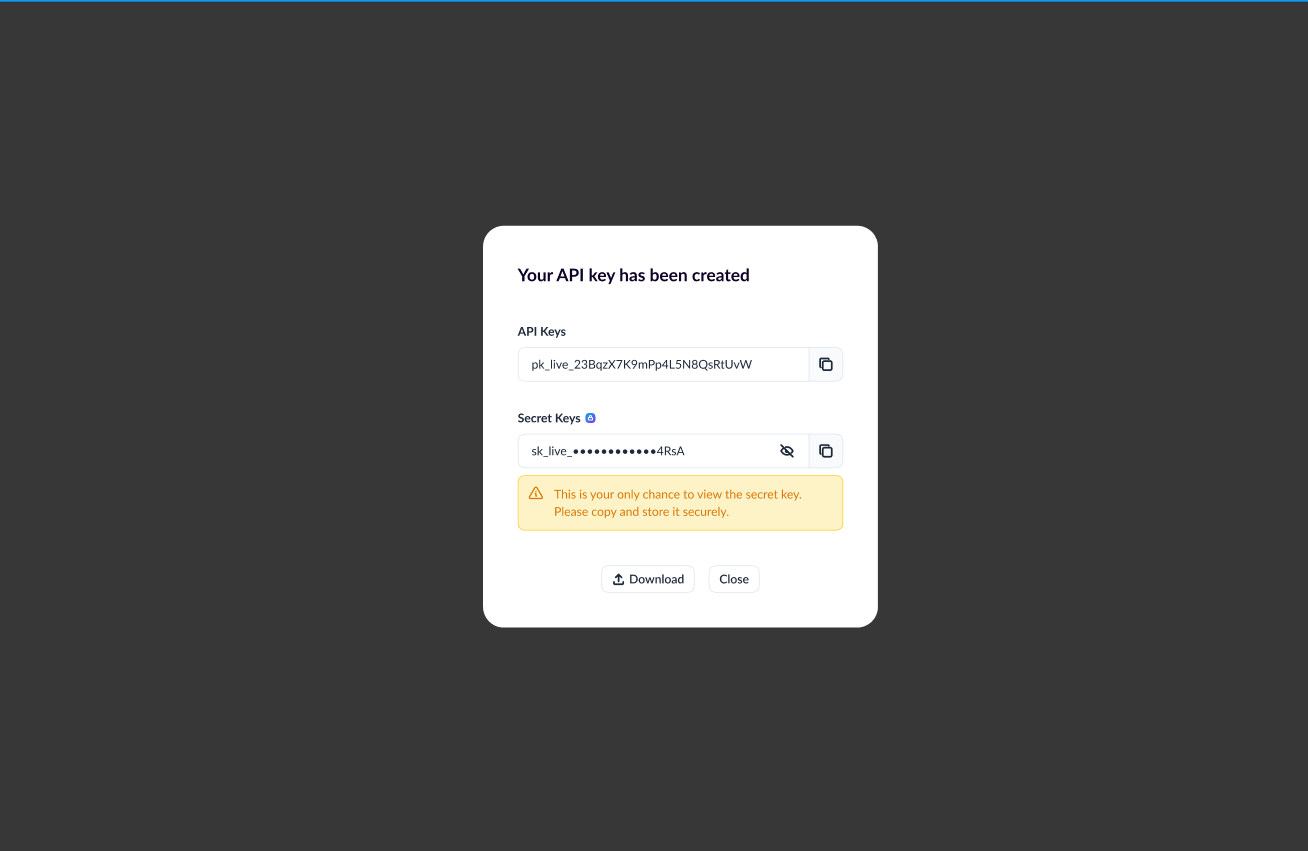
Critical: Save Your Keys Now!
The Private Key will only be shown ONCE!
You must save both keys immediately:
- ✅ Copy the Public Key
- ✅ Copy the Private Key
- ✅ Store them securely (environment variables, secrets manager)
If you lose the private key, you'll need to regenerate a new key pair, which will invalidate the old one.
Step 3: Store Your Keys Securely
Never hardcode your API keys in your source code!
Recommended storage methods:
# .env file (add to .gitignore!)
MARABOO_PUBLIC_KEY=your_public_key_here
MARABOO_PRIVATE_KEY=your_private_key_here
MARABOO_API_URL=https://gateway.mara.booversion: '3.8'
services:
app:
image: your-app
environment:
- MARABOO_PUBLIC_KEY=${MARABOO_PUBLIC_KEY}
- MARABOO_PRIVATE_KEY=${MARABOO_PRIVATE_KEY}
- MARABOO_API_URL=https://gateway.mara.booapiVersion: v1
kind: Secret
metadata:
name: maraboo-api-keys
type: Opaque
stringData:
public-key: your_public_key_here
private-key: your_private_key_here{
"MARABOO_PUBLIC_KEY": "your_public_key_here",
"MARABOO_PRIVATE_KEY": "your_private_key_here",
"MARABOO_API_URL": "https://gateway.mara.boo"
}Step 4: Test Your API Key
Verify your API key works by making a test request:
TIMESTAMP=$(date -u +"%Y-%m-%dT%H:%M:%S.%3NZ")

curl -X GET https://sandbox-gateway.mara.boo/api/v1/purses/wallets \
  -H "Authorization: HMAC-SHA256 ${MARABOO_PUBLIC_KEY}:${MARABOO_PRIVATE_KEY}" \
  -H "X-Origin: third-party-api.mara.boo" \
  -H "X-Timestamp: ${TIMESTAMP}" \
-H "Content-Type: application/json"const timestamp = new Date().toISOString();
const response = await fetch('https://sandbox-gateway.mara.boo/api/v1/purses/wallets', {
headers: {
'Authorization': `HMAC-SHA256 ${process.env.MARABOO_PUBLIC_KEY}:${process.env.MARABOO_PRIVATE_KEY}`,
'X-Origin': 'third-party-api.mara.boo',
'X-Timestamp': timestamp,
'Content-Type': 'application/json'
}
});
const data = await response.json();
console.log('Success!', data);from datetime import datetime, timezone
timestamp = datetime.now(timezone.utc).isoformat()
response = requests.get(
'https://sandbox-gateway.mara.boo/api/v1/purses/wallets',
headers={
'Authorization': f'HMAC-SHA256 {os.getenv("MARABOO_PUBLIC_KEY")}:{os.getenv("MARABOO_PRIVATE_KEY")}',
'X-Origin': 'third-party-api.mara.boo',
'X-Timestamp': timestamp,
'Content-Type': 'application/json'
}
)
print('Success!', response.json())A successful response (HTTP 200) means your API key is working correctly!
Managing API Keys
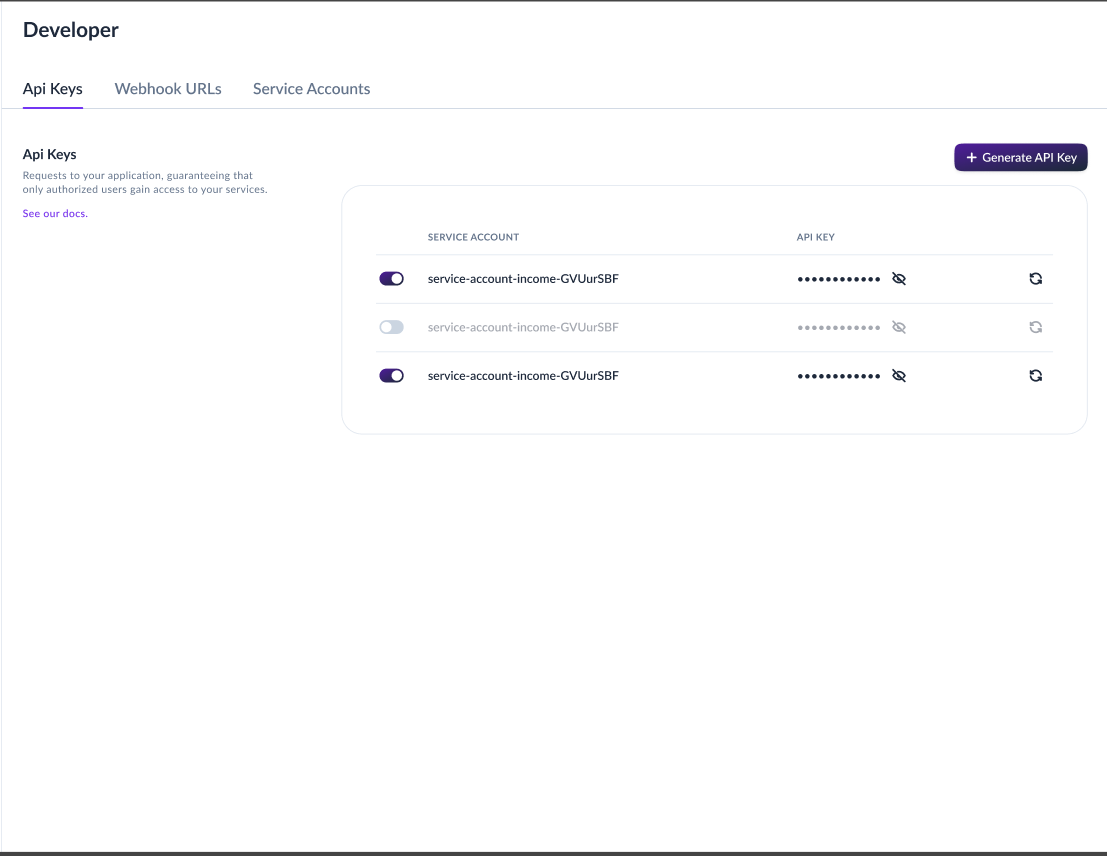
Viewing Your API Keys
To view your existing API keys:
- Navigate to Developers → API Keys
- You'll see a list of all service accounts and their API key status
- The Public Key is always visible
- The Private Key is never shown after initial creation
Key Limitations
- ✅ One active key per service account at any given time
- ✅ You can create multiple service accounts for different services
- ✅ Each service account operates independently
- ❌ You cannot have multiple active keys for one service account
Multiple Services?
If you need multiple API keys (e.g., for different applications or environments), create separate service accounts:
production-web-appproduction-mobile-appstaging-backend-service
Regenerating API Keys
You may need to regenerate your API keys if:
- The private key is lost or misplaced
- A key is compromised or exposed
- Regular security rotation schedule
- Employee with key access has left
To regenerate an API key:
- Navigate to Developers → API Keys
- Select the service account
- Click "Regenerate API Key" or "Regenerate"
- Confirm the regeneration
Service Disruption
When you regenerate a key:
- ❌ The old key pair is immediately revoked
- ✅ A new key pair is generated
- ⚠️ All services using the old key will stop working immediately
Best Practice: Have a rollout plan to minimize downtime!
Safe Key Rotation Process
To rotate keys without service disruption:
- Prepare: Review all services using the current key
- Regenerate: Create new keys in the portal
- Update Staging: Deploy new keys to staging/test environment first
- Test Thoroughly: Verify all functionality works with new keys
- Update Production: Deploy new keys to production
- Verify: Monitor logs to ensure no authentication failures
- Document: Update your key management documentation
Rotation Schedule
Recommendation: Rotate API keys regularly based on your security policy:
- High Security: Every 30-60 days
- Standard: Every 90 days
- Minimum: Before expiry notification (rotation period: TBD)
You'll receive email notifications before your keys expire.
Revoking API Keys
Revoke API keys immediately if they're compromised or no longer needed.
To revoke an API key:
- Navigate to Developers → API Keys
- Select the service account
- Click "Revoke API Key" or "Delete"
- Confirm the revocation
Immediate Effect
Revoking a key:
- ❌ Immediately invalidates the key pair
- ❌ All requests using the revoked key will fail with 401 Unauthorized
- ❌ The key pair cannot be recovered after revocation
When to revoke keys:
- ✅ Key has been exposed or compromised (e.g., committed to public repo)
- ✅ Service account is no longer in use
- ✅ Employee with key access has left the organization
- ✅ As part of security incident response
- ✅ Replacing with regenerated keys after testing
Security Best Practices
1. Never Expose Private Keys
❌ DON'T:
- Hardcode keys in source code
- Commit keys to version control (Git, SVN, etc.)
- Share keys via email, Slack, or messaging apps
- Store keys in plain text files
- Log private keys in application logs
- Expose keys in client-side code (JavaScript, mobile apps)
✅ DO:
- Use environment variables
- Store in secret management systems (AWS Secrets Manager, Azure Key Vault, HashiCorp Vault)
- Use CI/CD secret injection
- Encrypt keys at rest
- Restrict access to keys using IAM/RBAC
2. Separate Keys by Environment
Create separate service accounts for each environment:
production-api-backend     → Production keys
staging-api-backend        → Staging keys
development-api-backend    → Development/sandbox keys
Benefits:
- ✅ Limit blast radius if keys are compromised
- ✅ Easy to rotate without affecting other environments
- ✅ Clear audit trail per environment
3. Use Service-Specific Accounts
Create separate service accounts for different applications:
web-dashboard-api          → Web application
mobile-app-api            → Mobile application
webhook-processor         → Webhook handling service
data-sync-service         → Background sync jobs
Benefits:
- ✅ Isolated credentials per service
- ✅ Easy to revoke access for specific services
- ✅ Better audit and monitoring per service
4. Implement Key Rotation
Automated rotation workflow:
// Example: Key rotation check
const KEY_ROTATION_DAYS = 90;
const keyCreatedDate = new Date(process.env.KEY_CREATED_DATE);
const daysSinceCreation = (Date.now() - keyCreatedDate) / (1000 * 60 * 60 * 24);

if (daysSinceCreation > KEY_ROTATION_DAYS) {
  console.warn('⚠️ API keys need rotation!');
  // Trigger notification to team
}
5. Monitor and Audit
What to monitor:
- ✅ Failed authentication attempts
- ✅ Unusual API usage patterns
- ✅ Requests from unexpected IP addresses
- ✅ Key usage across different services
Set up alerts for:
- 🚨 Multiple authentication failures
- 🚨 Key used from unauthorized IP
- 🚨 Key approaching expiration
- 🚨 Unusual traffic spikes
6. Use IP Whitelisting
During the API access request, provide your server IP addresses to be whitelisted. This adds an extra layer of security:
- ✅ Only requests from whitelisted IPs are allowed
- ✅ Prevents key misuse if compromised
- ✅ Update whitelist when infrastructure changes
TIP
Use static IP addresses for production services to maintain consistent whitelisting.
7. Emergency Response Plan
Have a plan for when keys are compromised:
Immediate actions:
- 🔴 Revoke the compromised key immediately
- 🔴 Regenerate a new key pair
- 🔴 Update all services with new keys
- 🔴 Monitor for unauthorized access attempts
- 🔴 Investigate how the key was exposed
- 🔴 Document the incident and response
Troubleshooting
Common Issues
1. 401 Unauthorized
Possible causes:
- ❌ Incorrect public or private key
- ❌ Missing or malformed Authorization header
- ❌ Key has been revoked or expired
Solution:
- Verify keys are correctly stored in environment variables
- Check Authorization header format:
HMAC-SHA256 PUBLIC_KEY:PRIVATE_KEY - Confirm key hasn't been revoked in the portal
2. 403 Forbidden
Possible causes:
- ❌ Missing
X-Originheader - ❌ Missing
X-Timestampheader - ❌ Request from non-whitelisted IP
Solution:
- Ensure all required headers are present
- Verify IP address is whitelisted
- Check header values are correct
3. Private Key Lost
Solution:
- You cannot recover the private key
- You must regenerate a new key pair
- Update all services with the new keys
4. Service Account Disabled
Possible causes:
- ❌ Service account was manually disabled
- ❌ Suspicious activity detected
Solution:
- Check service account status in the portal
- Contact support if account was automatically disabled
- Re-enable the service account if appropriate
API Key Lifecycle
Next Steps
Now that you understand API key management:
- Authentication Guide - Detailed authentication flow
- Getting Started - Make your first API call
- Environments - Sandbox vs Production setup
- Security Best Practices - Comprehensive security guide